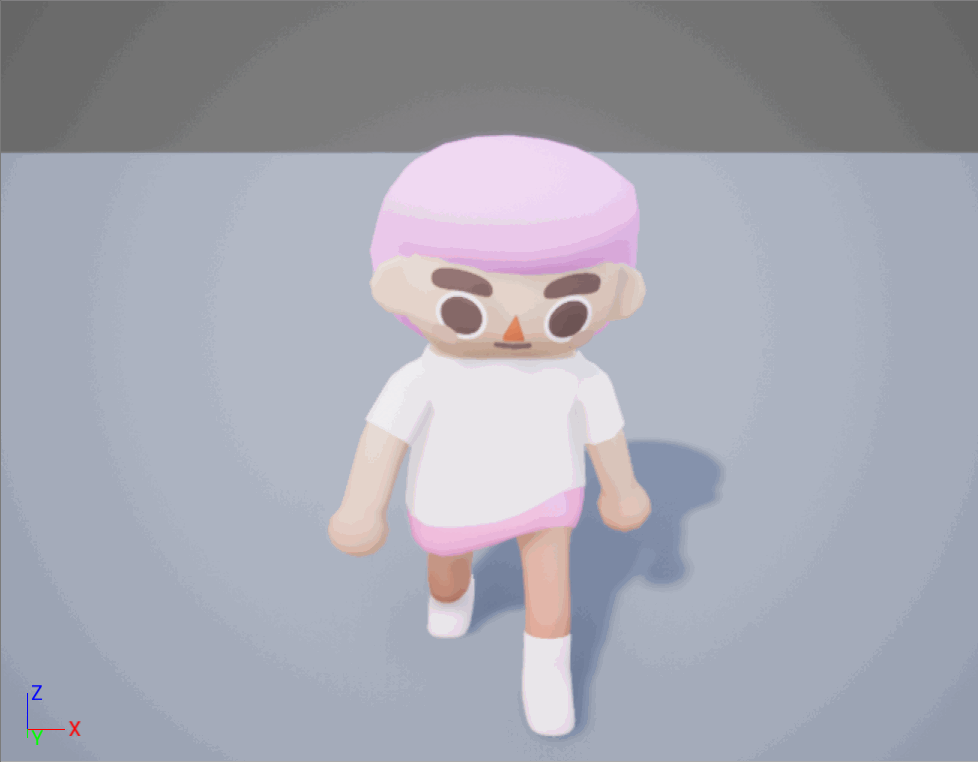
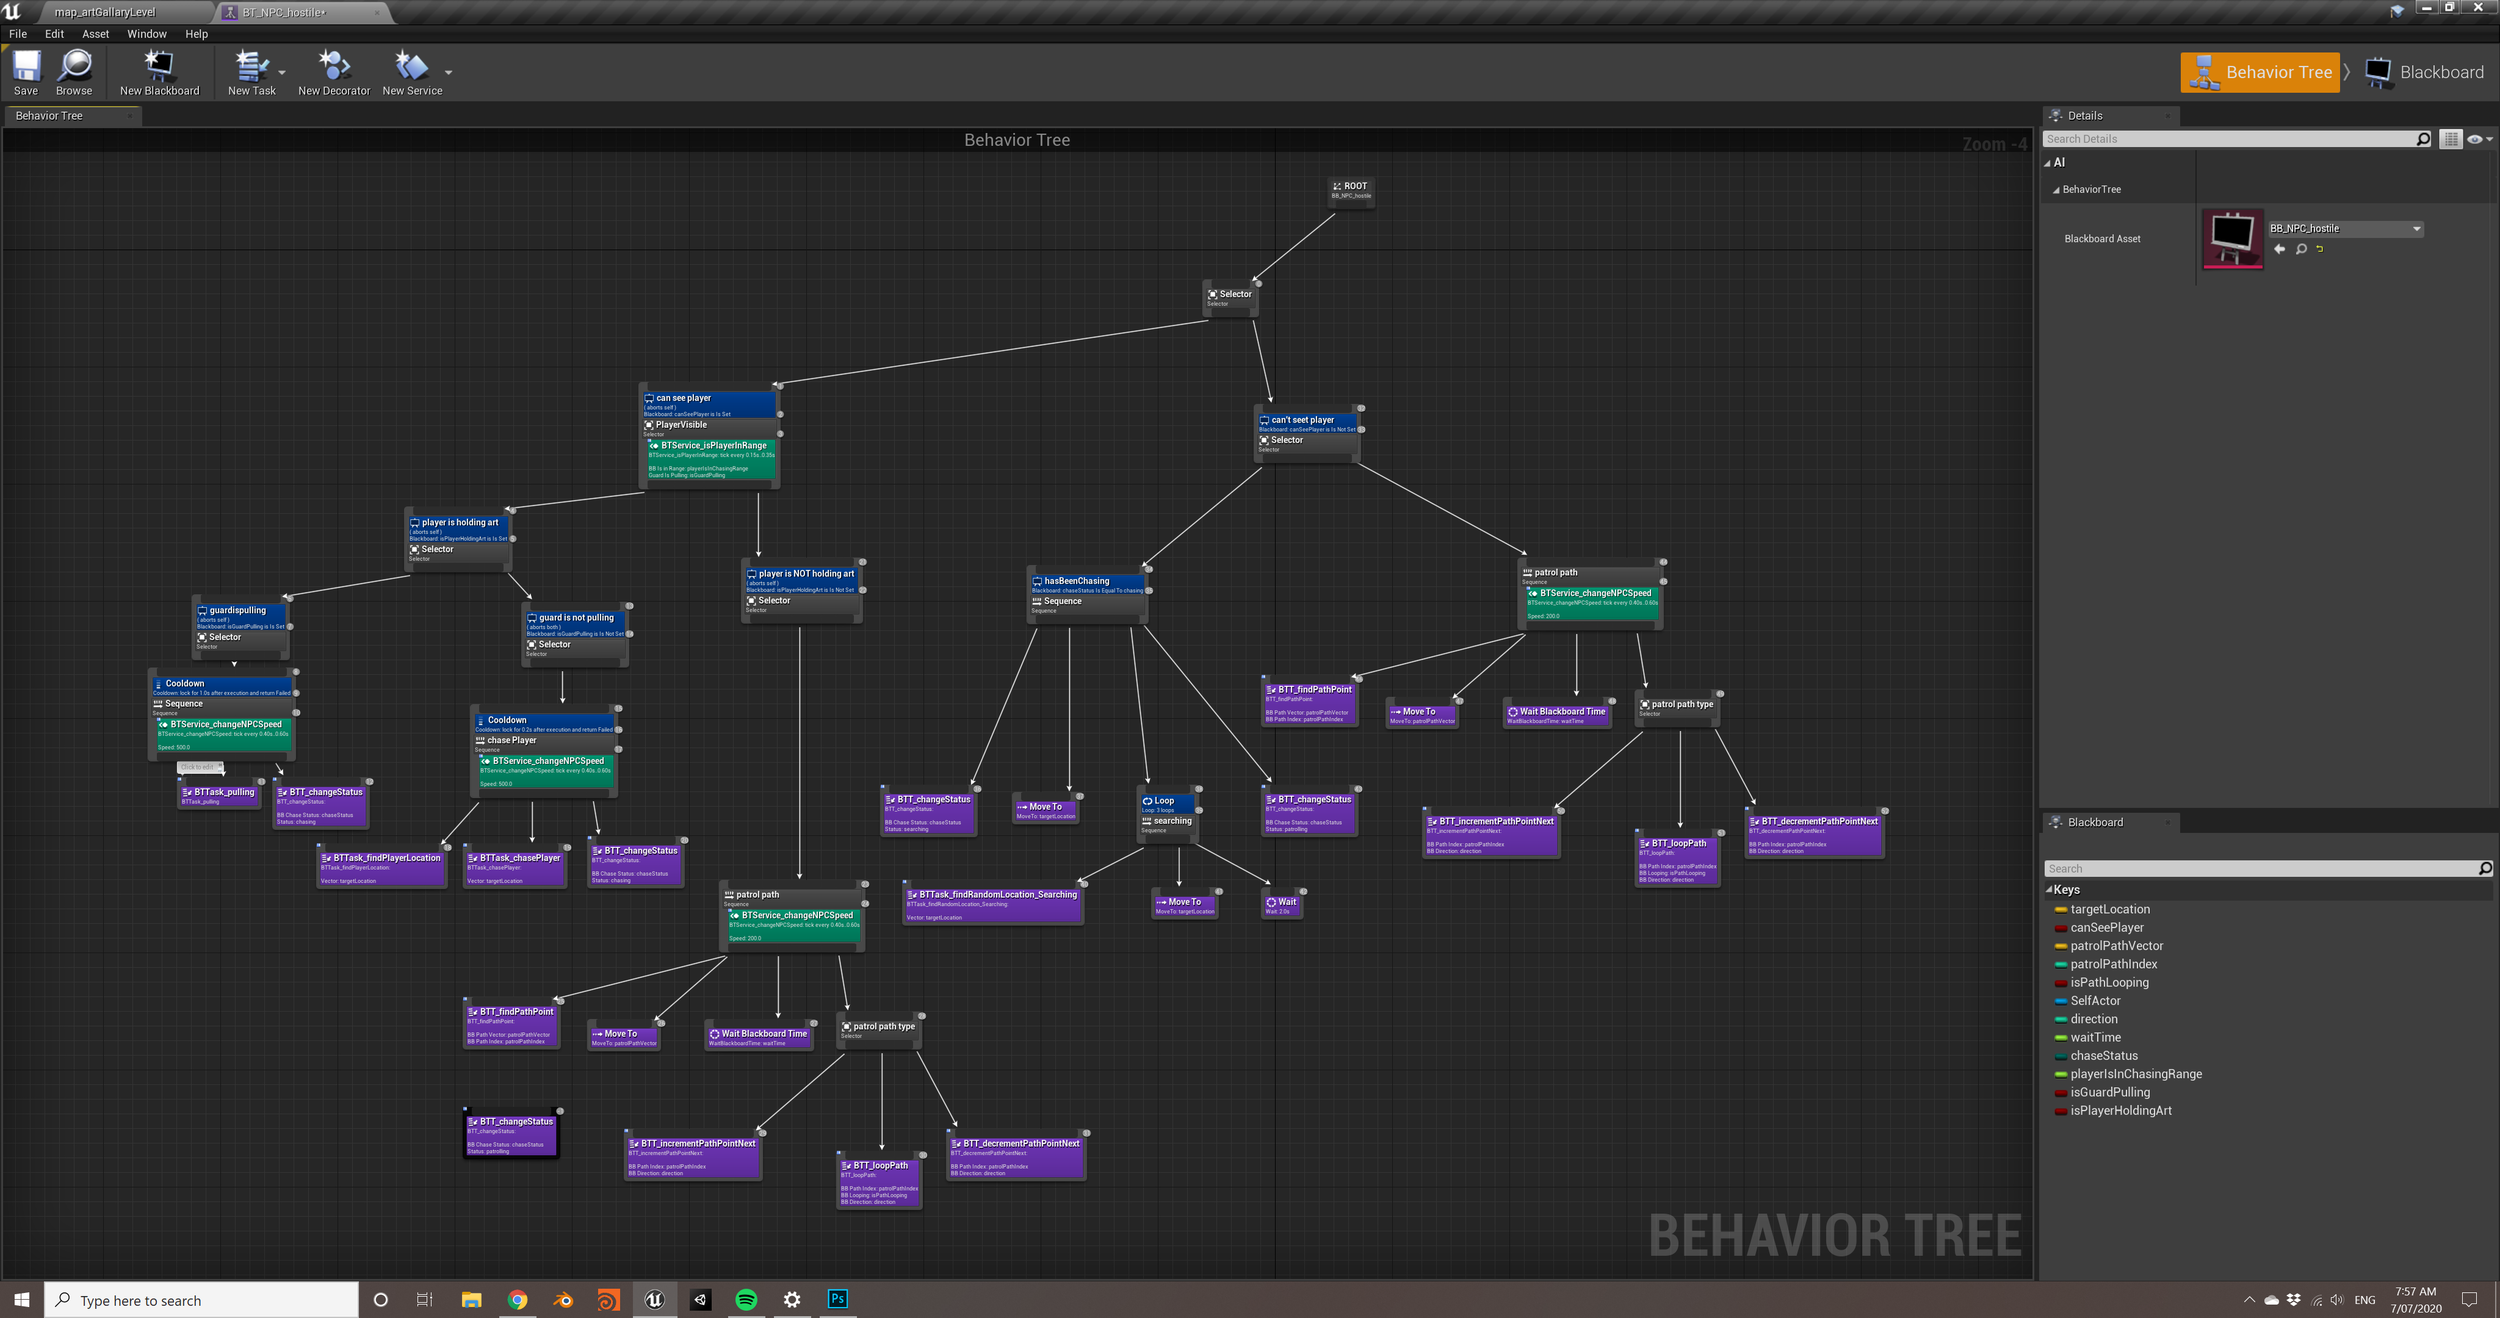
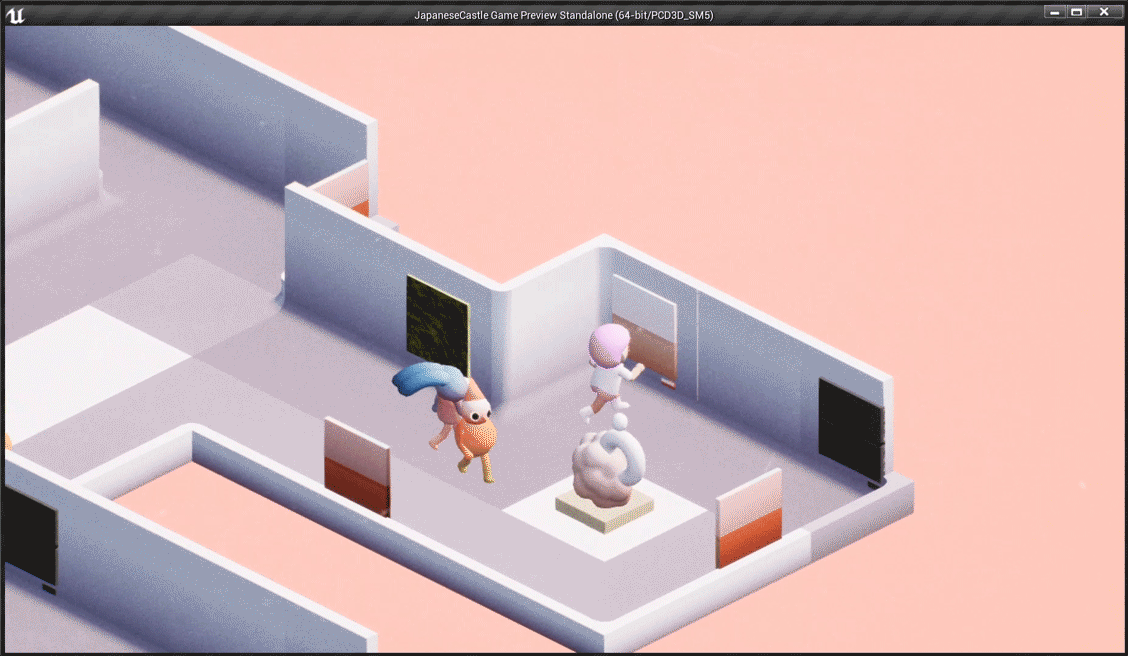
After multiple attempts I finally think I fixed the positioning bug of the guard to my player during the battle. It took quite of a bit of fidgeting with the nodes. Eventually i got to a point where I needed to validate which part of the code is breaking by taking out the setActorRotationAndLocation and put it into the test blueprint with a cube then I realised the delta time was preventing the transition from operating correctly. Also I realised the value of the actor locations are not being updated at the right time so at the end I just had to do it in an event tick to constantly update the variable of the actor’s location

fixedguardposition.gif

I’m so glad I got that fixed. It’s been bothering me for a while. I then started to work on the pause menu and linking it to the main map. I checked out a couple of tutorials to prepare for when I need to translate out from the level back into the main menu and bring back the art you stole placed in the room.

I also started to add sound effects - firstly with the door and footsteps. Going to do the menu sounds when i have a good idea for the background soundtrack. Marcos was helping me to brainstorm on how to create a procedural soundtrack to play based on the tempo of the game
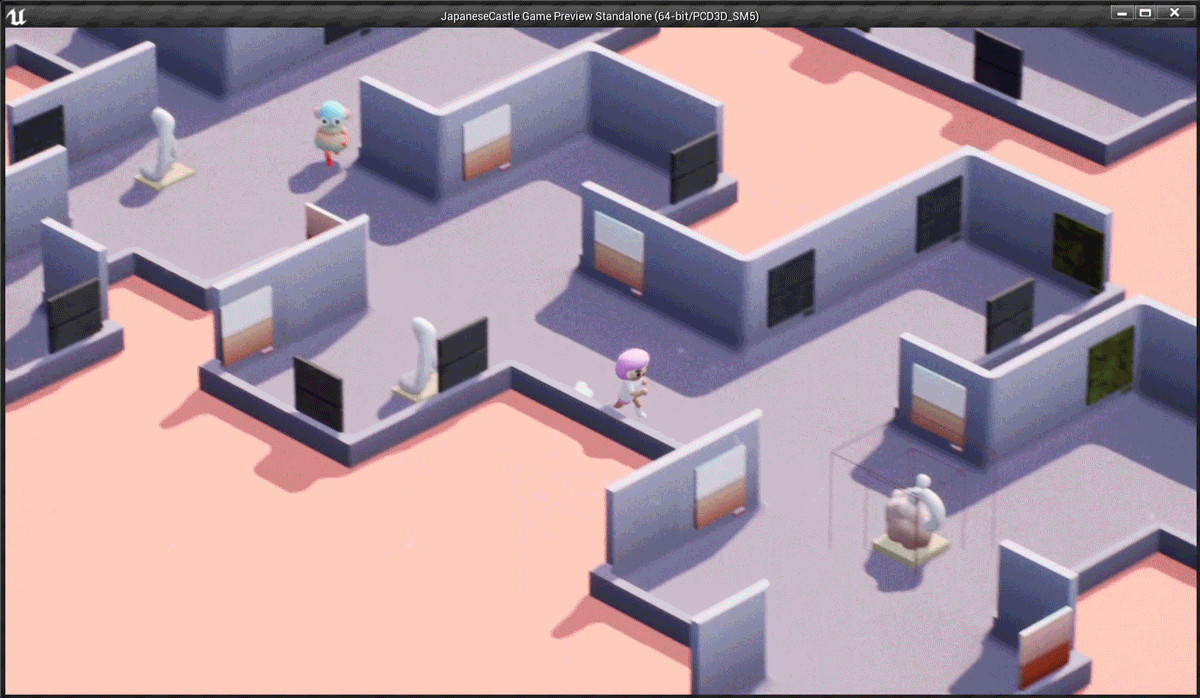
  1. browsing gallery

  2. stole the art

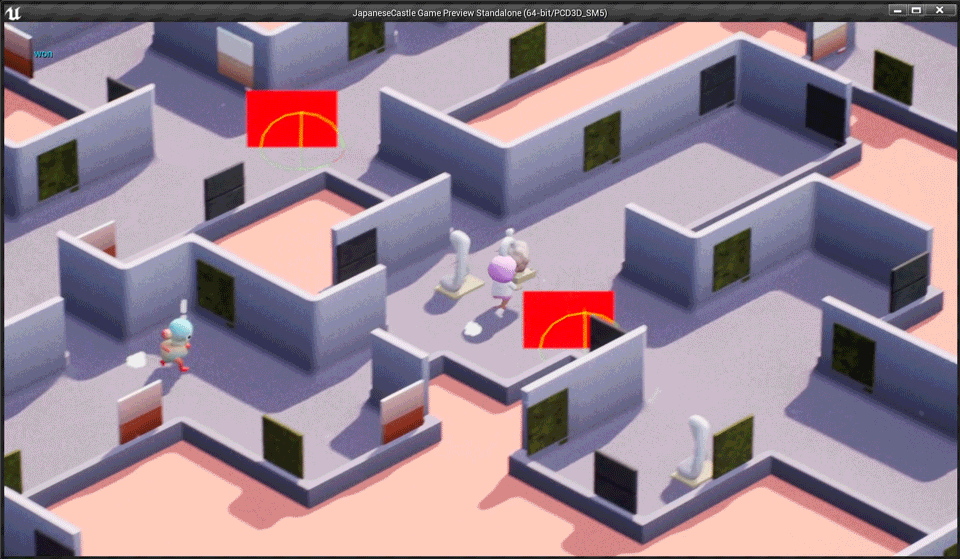
  3. caught and battling with guard

To do for tomorrow:

  • hook up sound effects for pick up art and tweaking

  • design the notes and sound that can be played dynamically based on the game state

  • pass variables from level (tutorial) if you have successfully stolen the art, and if so populate the main menu room with the art you have stolen.

Low hanging fruits!

I did a few things from the to-do list. Unfortunately didn’t get to repositioning the player and the guard location. since i tried to tackle it in the morning with a physics constraint but no luck. So moved on smaller tasks that I know I can achieve

#1 world space aligned UV material for paintings

I wanted to create a texture that resemble the artists’ style and generate set-dressing paintings by slicing it to the world space UV coordinates. I used this tutorial to create basis of the painting material and it ended up looking pretty cool.

#2 New guard design

I was looking at inspirations like this for a more formal distinction between the guests and the guard in the museum.

Untitled.png

I came up with something really quick in blender and slapped it into the engine, i had to do some adjustments to the neck scarf but overall he looks okay. It’s really easy to switch up the characters in the BP especially because all the NPC (guests and guard) share the same skeleton.

I also did some minor adjustment to the BP of the guest spawn after changing the BP painting spawn in the construction graph so I can see them all in the editor map view now.

#3 Started the menu system

I started sketching out the idea i have for the main menu of a floating tile in the stars. At first the first map i had couldn’t be duplicated properly then I realised it was because of the HDA file. So i removed it from the scene then duplicated the map and added the HDA back in.

I checked out this tutorial to change the camera from the player to a fixed on set in the scene. I am considering to build a specific floating tile with a blended gradient alpha to make it feather at the edge.

mainmenu.gif

To do tomorrow:

  • finish watching this tutorial to see how they position the two characters (a nice bonus because I was originally using it to learn how to transit the camera from one to the other but this may help me to solve the problem of how to position the player and guard when they are pulling

  • I might try to do a side scrolling view of gallery where it is an infinite corridor of art pieces that you need to collect

  • hook up the art in the main menu map to teleport the player into the map

  • set up exit game in the main menu

The joy of physics bug + improvements

I think i have mostly fixed the AI issue (or I chose to ignore it for now). Now I am trying to figure out why when the art is attached as a component to the player’s socket, it does not have collision. I scrolled through pages and pages of google results and it seems like it’s a root hierarchy issue that causes the component itself to not have collision.

I am not quite sure of that is true. I tried a couple of different methods:

  • expanding the player’s root collision capsule to a wider radius, but that makes the character too “fat” to fit through the corridor

  • Adding an additional box collider in the player’s blueprint but it does not detect static mesh collision yet interacts with the physics of the art piece BP

  • attaching a box collision as the root of the art piece BP, but that causes hilarious physics issue like the ones below… (even though i disable the simulated physics before attaching it to the character)

physicsBug_collision.gif
physicsBug_flyOff.gif

I later realised after fiddling with the physics setting is that there are some instance setting adjustment I did to the prize BP that isn’t updating when i change the original BP. All good. I also found that I didn’t set the abort operations in the “can’t see player” selector in the behaviour tree to Both, and there it doesn’t abort even when it detects that it sees the player until all the sequence is executed. Now the AI is actually quite tricky to loose.

I added a few more things

#1 ! and ? icons for the AI

Firstly I realised I need to switch the font file from runtime to offline so i can create a text render object inside the blueprint This step by step guide is very comprehensive in showing how to set up your font file. the problem with this approach is that the offline font will not work with the UMG (which requires runtime font). This is a different solution to the problem where I spawn a umg in screenspace so it tracks to the object in the scene.

AI_iconChange.gif

I was trying to figure out how to get it hooked up into the AI state. I was thinking of maybe doing a state change in the AI controller but no luck on piping the status in. doing it inside the player BP seems like a lot of state management. I tried to create a task then realised I could use a service and expose perameters such as visibility of the textrender and the content of the textrender to enable that.

#2 Add animation for knockback

Right now the player immediate transit from the tuckawar pulling animation back to holding, I wanted to give a more realistic representation, so I added a knockback animation.

#3 change the run to press Shift

I wanted to have more control over the character so I switched back to the hold down shift to run and change the pick up input to E. Mostly because I wanna play with more tension when the player can choose to accelerate. Possible enhancement is to add an audio effect to the run which will trigger the hearing perception of the AI.

To do for tomorrow:

  • disable dropping the art when the player is pulling with the guard

  • figure out how to position the player and AI during the tug a war

  • new guard character design

  • make paintings

  • making the menu screen

AI behaviour fixes and blueprint interface

Today i basically spent the whole day rewiring and trying to debug a couple of issues

  • reposition the characters (player and guard) so that they will be pulling the art in a coherent direction

  • switch the behaviour from patrolling to chasing/pulling when the guard sees the player holding the art (right now it is not consistently executed)

  • the AI perception is not updating frequently enough to get the latest information that the player is holding the art, therefore unable to switch from patrol state even if the player is right in front of them with the art

I first started off getting a refresher on what blueprint interface does because the set up i had for the initial behaviourial change for the AI is a mix of AI sending signal to start pulling and then the player has to send a signal that the pulling is over and who won.

This tutorial was useful in explaining why the functions change usage in other blueprints that implement this interface when you add an output to the function (it requires a return node), but they didn’t actually go into explaining how to use a function with an output.

A different tutorial actually explains how to use interface function to fetch a variable from one blueprint and pipe it into another. This was helpful but at the end of the day I decided that I need to switch make to the event of begin overlap with a collider to kick off the event of start pulling with my player instead of getting the AI to fire off the event. Problem with that is that when the AI can’t see the player, and the player brush pass the AI it will still trigger the pulling while the AI is in patrol mode

I then spent a few hour mangling with the AI behaviour tree to try to get the AI to actually recognise the player is now visible and holding a piece of Art work to kick off the chase. it’s a little bit tricky because the bug is not consistent. I find that if i get to the art relatively fast (which i do now that i have played so much) before they finish the first loop of patrol, the Ai fails to detact me.

Tomorrow I will continue to try to figure out how to consolidate the variables so there isn’t as much game state sync issues.

The blackhole of game states

Back from LA, had some running thoughts on the level a couple of things i jotted down to tackle:

#1 main menu: a slice of your mini gallery of art your have stolen from different galleries

  • galaxy background as the void

  • black shader for the silhouette of the art piece - select space bar to take you to the level

  • escape door or hole to exit out ofthe game

  • credits?

#2 In game: need to show the art you are suppose to steal

  • at the beginning or maybe as a UI in the top or bottom right corner

  • a texture render of the turntable of the art?

#3 Success/Fail state

  • A newspaper with a photo of the character holding the art and running to the exit door

  • A news broadcast of the player running away with the art

  • alien language subtitled “human art stolen by a human”

  • fail state is probably a mug shot of the character

  • question: should we make it roughlike where we erase your old process

So i got back into the AI behaviour tree, a few things I need to refresh myself on… I changed the blackboard variable of playerinRange to a float so I can access the distance the AI have from the character. If it is close enough say 128 units then we will kick into fighting mode. Otherwise they will pursue the chase.

I also learnt from this tutorial that I need to change the variable Auto success range from last seen in the AI controller’s AI perception setting to a larger value so if the player escapes from the peripheral vision, they will still remember they just saw them. Also quick tip on debug mode of the AI using ‘ as a shortcut to bring up debug drawings of the perception cones and nav mesh etc.

I then went down this blackhole of the blueprint interface to try to figure out ways to pass variables between the AI and the player. I might just end up scrapping that after trying to tease this out for a couple of hours.

Tomorrow I will try to watch some interface tutorials and decide if I need to scrap it and just do it the dumb way.

Bugs for tug a war state

So today I was incredibly ambitious by embarking on the journey to try to engage in the tug a war with the guard that intersects with you.

There is a lot of complex states. a couple of things I wanted to achieve

  • when the player and the guards are within the proximity, both parties are not moving and animates to the pulling animation clip

  • after 3 seconds (I learnt about timer with events from this tutorial), check how many times the space bar is tapped if it is above 12 times then the player have successful beaten the guard.

  • if it was success the character can resume motion and have a cool down time of 5 seconds before the guards may catch up again

Holy moly that was a lot of mind gymnastics for me. I haven’t gotten it right so i have recorded a couple of bugs for us to look at

the AI behaviour tree is not accurately locking into the state of pulling. Instead she just walks away

the AI behaviour tree is not accurately locking into the state of pulling. Instead she just walks away

there is a mismatch in the animation state, also i would like them to be a little bit further a part. i need to reposition them

there is a mismatch in the animation state, also i would like them to be a little bit further a part. i need to reposition them

triggering the wrong state. sliding the player all over the place.

triggering the wrong state. sliding the player all over the place.

I am going to LA tomorrow for a week so I will need to take a break from this hopefully when i come back i would have some new ideas and also a refreshed mind to try this again. I think most of the issues here is that the AI behaviour tree isn’t really set up for this. it gets stuck in pulling mode without being able to transition off to other sequences.

I thought I was going to stop there but instead I added widget ui animation to the success menu and hooked up to replay level and animation. I also added camera shake to the tugawar.

Dummy Patrol AI trying to catch the thief

Today I spent a reasonable amount of time (plus quite a bit of procrastination) to set up the adversarial dummy AI. There are three main behaviours it exhibits:

  1. it patrols in a set of locations based on a single BP (I probably need to figure out how I can fold that into my houdini WFC if i want to do it more dynamically

  2. if it sees the player holding a piece of art, the AI will start chasing

  3. if it looses sight, it will go to my last seen location, search for three times around a fixed radius and then return back to patrolling

It was an immensely technical and crazy way to set up those AIs - establishing all the conditions and behaviour of the AI… There were a few things I had to debug and thank you to the youtube comments to help out with some of the missed steps in this tutorial. Where they have edited out the set up of the changing status of the AI from chasing to searching.

It’s pretty fascinating how having friendly NPC guests roaming around and certain art pieces around really obstruct the escape.

I think the next step is to introduce a fail state (if the guard touches you? or should we do some tuck a war activity between the character) and switch out the guard to my own character,

Visual touch ups - world based gradient, poofs and puffs

I was on an email exchange with Tom from @tharlevfx on youtube and he helped me to clarify how to construct a world space based gradients so that the WFC tile sets will have a unified look regardless of its height in each of the object modules.

betterWFCGradient.gif

I then went off on a little bit of a tangent looking for fonts for some of the UI elements. Tried out a couple of different styles from cute chubby to elegant stylised. I was wondering what kinda of name would be representative of this experience and for now I think I will call it artist steal (inspired by good artist copy, great artist steal)

I was going to do some character modelling for the art gallary guards but instead I went down this rabbit hole where it suddenly crossed my mind that the reason why dynamic shadows was not popping up in my playmode is because of the orthographic view in my camera setting.

this is an ancient bug probably 5 years plus where no dynamic shadow is created because of the orthographic setting. if I change it to perspectives they would appear.

So i had to follow some advice on how to fake orthographic view with perspective

  • set the camera FOV to 10

  • meaning you would need to extend the camera boom to a very far distance

  • also came to realisation that I should not be manually rotating the followcamera object if i want to see the character at an angle. instead I should be rotating the camera boom to get the top view

  • adjusted the contact shadow bias to lower so that it brings the shadow close to the character’s feet

To continue my procrastination I wanted to added some vfx for my character when she runs around. I followed this tutorial and made some of my own style adjustments. It works really well with the skeleton and all i have to do is to add a notifier event. I also learnt a few more settings to create burst vfx.which i am going to apply for the pickup vfx for the prized object.

I think next steps I will have to make some guard characters. I am still deciding if I want the game mechanics to be based on puzzles and timing or chasing.

  • I will probably get a better understanding when I build out the patrol system for the guards. or not? I stumbled into this interesting article about computational geometry called “art gallery problem

  • I want the success state to have an alien newspaper topline saying how a painting has been stolen. maybe with a shocked pompous art gallery owner right next to it.

pick up particle effect

Perhaps I should be doing more meaningful things for the gameplay but i wanted to add some vfx to my interactions. So i decided to try to remember how to use the cascade particle system on UE4

It took me a little while, because the style I wanted to go for in terms of VFX is more illustrative and stylised which isn’t very common for UE4 tutorials. I cam across this one to do a procedural pulse that I edited and changed.

particleEffect_atRuntime.gif

Maybe I will start looking into creating the enemy character or the branding of the game tomorrow

Pick up and attach art

I decided to try out enabling and disabling the physics when picked up and see if that would improve some of the crazy swings of the asset when in motion. it seems like it has helped and i also adjusted the attachment point from a general grab point using the scene object to just parenting it the character mesh with a socket from the ribcage area.

I wanted to see if I can trigger a success state, i looked at a couple of different tutorials, I wanted to blur out the scene and show some text. I created a widget and added it to the viewport. Then i probably spent about 20 min or so looking at different ways to adjust the post processing volume so I can change the depth of field.

Which later I realised it probably does not work with the orthographic view and therefore no matter what I did in the blueprint the visuals won’t be visible. I did however find a way to desaturate the scene which is probably something I will use when I am looking into the fail state.

Instead what I did is that I found a tutorial that allows you to add a background blur component to the UMG widget, which works exactly how I want it!

I then spent a bit of time with this tutorial, it’s really long but the guy does a really good job explaining concepts and tradeoffs of certain blueprint decisions for detecting when the player is in proximity to an interactable object. I went through it quickly until i got to almost the end and learnt about the node patch i need “add impulse” which requires some shuffling of the order of my blueprint to make it look right. but it did the job.

I then wanted to add some particle effects when I pick up the art, which is more complicated than I anticipated. I made some graphical stars and circle texture so it can be used for particles. Maybe I will continue that tomorrow, since I plan to start adding enemies over the weekend.

Pick up object

Picking up from yesterday, I started the day with this tutorial to try to pick up the prize art and attach it to the player to walk around.

Using physics to drive the pick up is actually really fun because the art just flops around . I tried another approach of attaching it directly to the socket of left hand that is done without physics and whilst it’s more manageable (i dont think the attach point is proper either) but I find it less fun.

Instead of added the animation and blendspace of holding idle/run for the character. It looks really fun but I really do need to figure out why there is an offset to the attachment. I tried to switch over to a different attachment type and instead of enabling physics. I wanted to see if that will stop the bp from spinning around the attach point. So instead i have to switch the collision profile from physics pawn to vehicle and it was definitely no go!

It’s not super successful in my attempt to adjust how things attach. It seems like that even when i am using attach to component, the item is still spinning around the attach point. I think i need to figure out how to attach it without physics.

I will try again tomorrow and see if I can figure out.

Fixed Camera & added new spawn point for prize

Today was a little bit of a slow day. I was a little bit exhausted from non stop video calls back to back. So I didn’t expect I would achieve much, Before dinner I fixed some of the clipping issues of the camera (mostly because the camera appears to be intersecting with the geometry and i didn’t position it correctly. now it is fixed.

I then wanted to investigate how I can start building up some game play elements. First I thought I should enable a success state. Where the player need to locate the art piece they intend to steal. So to enable that i need to first be able to place it.

placingPrizefurthestFromPlayerSpawnLocation..gif

Interestingly I took a very simplistic approach using the point VOP to pick the first point of the tile that is 255 (just floor). Then when the WFC seed is 64, the art piece is spawned right next to the player. So I decided to try to use the furthest floor point from the player’s spawn location as the spawn location for the prize art.

Took me a little bit of digging eventually I realised I can sort the distance generated from my point VOP and just delete everything else that is not pt=0.

The next step i am going to do is work on the prize art BP to allow the player to pick it up.

new NPC in UE4

Yesterday i made one more character (definitely less than the 3 i hoped for, but it was definitely harder to come up with more unique designs. So i ended up watching Laputa by Ghibili studio at night instead).

This morning I set up the character with the few animation clips I had for them, whilst I had to adjust parts of the armature because the should bone segments are too long. And after some back and forth with UE4 and blender. I noticed the character animation clips have a weird twitch on the right side of the leg.

I thought it was an import/export issue with the fbx, so i tried a whole lot of different export setting from blender, like: add leaf bone, recalculate the roll of the bones, reset the shoulder bone adjustments. A whole lot more that took me a few hours in the morning.

I was a little bit exacerbated since there are so many variables that can cause the issue. So i tried to delete the right leg bones from the armature and copy and pasted the left leg over. It then work!

I then spent a bit of time to refresh my memories of how to set up anim blue print specifically around blendspace - being able to drive a set of animations and how they blend based on a property/variable.I used this tutorial to set up my blend space. I still need to figure out how to pipe in variables like the NPC is close to a piece of art work and look intriged by pointing or thinking. I will need to do some investigation around that.

newNPCIn.gif

Then i moved onto figuring out how i can just import the NPCs whilst reusing the skeleton. I checked out this tutorial, and tried exporting the assets, then realised I probably need to just use the same armature for all the NPCs. instead of having them on separate armatures. So I put the npcs into different collections whilst parenting them to the one armature. it worked well…

I think i can just use the same system for the enemy guard NPCs. Excited to try that out! Next I think i wanna fix the camera clipping issue and also figure out how to direct the NPCs to look at art. Maybe I should also do the paintings, it bothers me how terrible they look in the gallery context

Character position fail + WIP NPC art pipeline

I was trying to tweak lighting and lightmap resolution today in a bulk action operation I accidentally removed all the collision bounds i set up so i basically spent the morning redoing it for all the WFC tile set. Not super fun but since i’ve been doing so much back and forth with those meshes I’ve gotten to be a lot faster.

After lunch I was looking to how to orientate the player character so that when she is spawn she will be looking at a wall. I had an idea of using boolean of the wang tile set to create surfaces that would then be able to isolate the directions that are not attached to the wall. After a few trial and error I managed to map normal directions as I wanted.

Untitled.png

Only until later when i re-instantiate the HDA, do i realise the blueprint does not respect that normal information. I am not quite sure if it’s something I did wrong on my end or is this not supported by the HDA engine yet to translate blueprint rotation from normal.

Anyways so I took a little break from it, and after a walk around my neighbourhood I decided to make some npc to put into the scene. I knew I wanted to make a few of aliens and fun abstractly shaped aliens who are pompously looking at art. I didn’t want to make it labourious process to make them so I can focus on dressing them up.

Untitled.png

So i did what I usually do when i’m lazy, I made a standard dummy fbx to rig in mixamo. Bring the skeleton back and auto weight a bunch of differently shaped characters onto it. I figured out a few small quick hack. this time I wanted to make the characters more gradient based so even if the actual character design is mostly a mash up of basic shapes they still look interesting. So I created a few strips of gradient texture and try to map the UVs to it that looks visually pleasing.

I also figured out a fast new way to morph the eyes to the shape of the head since I wanted the character design to have a strong silhouette with different body shapes. I previously mostly used the shrinkwrap deformer but this time I just made a fast simple deform to speed things up and change the proportion of the eyes until it looked good.

fastNPC_walkloop.gif

so basically on the art side it’s all about being lazy.

Tomorrow I think i will make another 3 characters then try to put them into the engine

Almost gave up on the visual issue but I fixed it!

I think i need to take a break for trying to sort out why the geometry and the material isn’t rendering correctly. there is something odd about the lightmap as well as perhaps the geometry to handled when imported in. Maybe I should try to reimport them.

Untitled.png

anyways I did some light visual touch ups with the post processing by adding grain, I will probably do a LUT pass once I add in some more art pieces to fill the space.Perhaps I should also start adding in the piece the player has to steal in the level.

Surprise, I tried to reimport the problem tiles from the original tile set source and make the same edits and export it into the UE4 project folder and now the issues are resolves. Not quite sure what happened but hey i will just keep going.

Untitled.png

I do however receive this error “WFC_layout_unreal_2 Large actor receives a pre-shadow and will cause an extreme performance hit unless bCastDynamicShadow is set to false. “ which i probebly need to fix. it doesn’t appear when i have it as static or stationary prop but that interferes with my player navigating through the space.

So I did some research and will just take it that currently it’s okay since the floorplan isn’t actually going to move at runtime to cause hiccups in preshadow calculation. I also changed the only directional light i have from static to movable which apparently “saves performance”. The problem is that in edit mode I can see the dynamic shadow but it’s not rendered in play mode.

I fixed some of the painting layout, some of the painting spawner is still positioning at the corridor entrance because the way i generate the points. I decide to take a (possibly really dumb) approach and just booleaned out the ones that are sitting in the zone of the corridor tile.

I might take a break from the engine visuals and work on some friend NPC characters to populate the space.

Stuck: Lightmap and asset import hell

Today was not super fruitful. Tried to figure out why some of the tiles are not rendering properly. A few things I got stuck on are:

  • some tile sets like 92, 28 and 7 keep being imported with a broken normal or face geometry so it appears a lot darker

  • there are some artifacts when the static mesh build light, if i force no precomp light, the problem of darker tile sets persists

If I force no precompute lighting the problem of the darker tile set persists

If I force no precompute lighting the problem of the darker tile set persists

I tried referencing threads like this to figure out what changes I can do to make the situation better

  • increasing the lightmap resolution from 32 -> 128.

  • adjusted the padding of the lightmap from blender unwrap with a more generous amount 0.32

  • adjusted indirect light quality in ue4 to 2 and indirect lighting smoothness to 0.1 (based on this [modular lightmap thread][1])

Look dev: linear vertical gradient overlay on object UV

I wanted to start making the environment looking better I tried adjusting the cel shading post processing but I am not really enjoying how the lighting and shadow looks as a result of that shader,

I also went into reviewing how i can add more graphical touch to my assets, In blender, where I used to create my everyday art, i often used a shader with vertical gradient to tone and give more dimensionality to my flat shaders. I tried a couple of things with world position and eventually found this tutorial that noramlises a conversion of object space for gradient.

Untitled.png

Then I went into a rabbit hole of trying to fix the normal of 2 specific tiles 23 and 91. Not quite sure what happened there (maybe something to do with the export setting i had where the mesh has custom normal splits and causes the normal direction all weird. Despite trying out to smooth out and rebuild the mesh it’s still not quite right.

Untitled.png

I will try again tomorrow and maybe take a closer look at shader and look developments. Probably in the direction of this.

Spawn random NPC and paintings

I finally got spawning paintings and npc blueprint from a separate BP actor as a blueprint. It took quite some time to figure out what is the issue. I was at first trying to learn about different ways that i can spawn a bp randomly. So the “select” node it is!

I was following along this tutorial, but even after setting up all the nodes exactly like him. when I hit play, no characters is seen. So I decided to switch gear and see if I can just spawn the paintings randomly, it was a success with the spawn all actor from class. So then i went back to the drawing board to figure out what’s wrong.

spawningPaintingAndNPCs.gif

Eventually i tested out pulling the BP AI spawner up and then the characters successfully came in. It was because the character get spawn at z:0 that they just drop out of the map.

Next pass is to create a set of general crowd NPC characters.

Revamping AI controller

I was originally planning to figure out how to spawn a set of NPC from the same blueprint, unfortunately I wasn’t able to find any useful tutorials to help me push forward.

So instead I decided to go and fix some of the AI NPC behaviours by following along this tutorials. Wow the UE4 AI system is pretty intense with a lot of different subsystems like behaviour tree, blackboard keys and AI controllers.

I adjusted the roaming behaviour for the AI but thought I also follow along for the enemy that will chase down my character when they grab the art from the museum. The next part I might check out the patrolling behaviour tutorial.

It might be good for me to do an art pass on what the NPCs should look like in preparation for being about to spawn them randomly into the scene with a single blueprint class.

Spawning paintings along the wall

I was a little bit tired today I wasn’t quite sure if I would be able to work on the level, but i did! I feel like documenting my progress is definitely incentivising me to push ahead. Today I figured out how to spawn paintings along the wall. And I mostly figured it out without looking up too much video tutorial

inRoom_WFC_paintingOnWall.gif

The steps I took was to extract the layout and fused all the points then resampled them. It took me a while to figure out how to create the correct normal direction along the wall surface so that when I spawn the paintings in UE4 it will be facing the correct direction. I used attribute wrangle for the first time without tutorials (to my surprise). I also used the attribute wrangle to create and offset for the position of those painting instance so that the painting can be positioned flushed against the wall.

I initially thought that I can just use a group range to find the middle point of the tile sets. Later on when i spawn the instance in UE4 I realised some of the corner pieces still persist and I need to remove it. I address that later on the process with a lot of struggle in trying to understand how to mark the corner from the initially fused tiles and remove them after I generated the normal data I needed for the points.

Eventually I realised I need to do a group transfer (probably not how you are supposed to do it, but hey it gets the job done, so i am just not going to touch it from now on). I exposed some of the parameters out so we can adjust the random seed and density of the painting layout

The next thing I probably wanna tackle is to figure out how to spawn different instances of the BP for both the painting, physical art and NPCs.